
Bleed, Crop Marks and Safe Area Guide for Proper Print Design
When preparing artwork for printing, using the correct document size is not enough. Designers also need to understand bleed, crop marks, trim lines, and safe areas to make sure the final product still looks clean and professional after printing and cutting.
One of the most common mistakes is creating artwork exactly at the final finished size without adding any extra area around the design.
On a computer screen, the design may look perfectly aligned. However, after printing and trimming, several problems may appear, such as:
- White lines along the edge of the printed product.
- Background colors or images not reaching the edge.
- Text or logos positioned too close to the cutting area.
- Important design elements being partially trimmed off.
- Borders appearing thicker on one side than the other.
- The finished design looking slightly off-center after cutting.
- Front and back artwork not aligning perfectly on double-sided printing.
These issues do not necessarily mean that the printer or cutting machine is defective. In real production, there is always a certain amount of printing and cutting tolerance that should be considered during the design stage.
1. What Is Bleed in Printing?
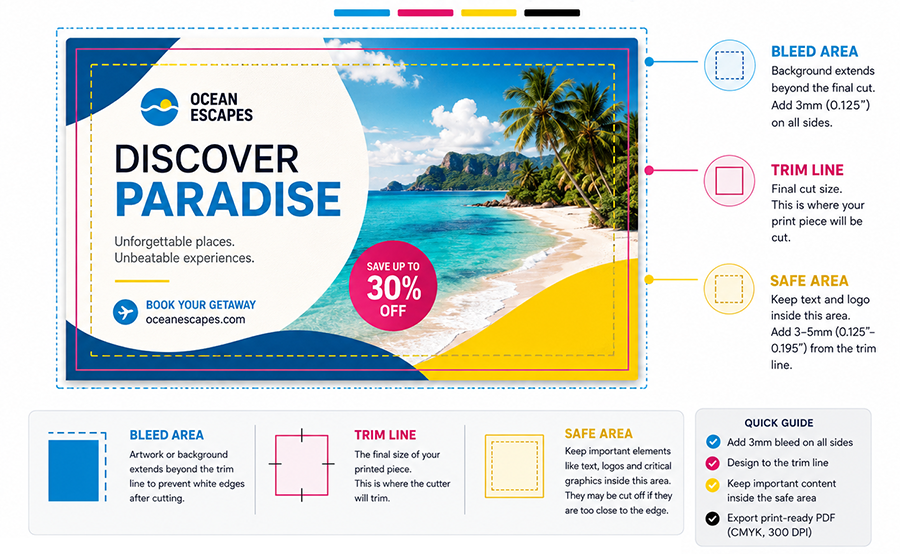
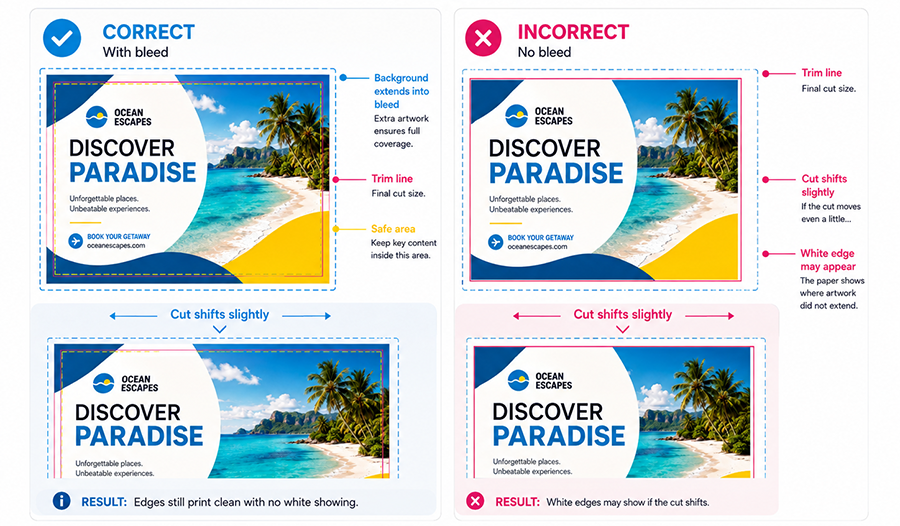
Bleed is an extra area added beyond the final trim size of a design. Background colors, photographs, or graphic elements that are intended to reach the edge of the finished product should extend into this area.
The main purpose of bleed is to prevent white edges or exposed material from appearing when the cutting position shifts slightly during production.
For example, if you are designing an A4 flyer with a final size of:
210 × 297 mm
and the printing company requires 3 mm of bleed, the background should extend at least 3 mm beyond every side of the final trim size.
This means the background or photograph should not stop exactly at 210 × 297 mm.
2. Why Is Bleed So Important?
During production, the cutting blade does not always land on the exact digital trim line down to a fraction of a millimeter.
Small shifts can occur for many reasons, including:
- Mechanical tolerances in cutting machines.
- Movement of the material during cutting.
- Printer roller movement.
- Media positioning inside the printer.
- Slight movement of the printed artwork on the sheet.
- Material expansion or contraction caused by heat, ink, or finishing.
- Movement within a stack of sheets during trimming.
Without bleed, even a very small cutting shift can expose a white line or the original color of the media along the edge.
With bleed, there is additional printed artwork outside the trim line, giving the cutting process a margin of tolerance.
3. How Much Bleed Should You Use?
For many standard paper-printing jobs, a common bleed setting is:
3 mm to 5 mm on every side.
However, this is not a universal rule for every printing product.
Some jobs may require larger bleed areas, especially:
- Large-format printing.
- Banners.
- Event backdrops.
- Contour-cut stickers.
- Fabric printing.
- Packaging.
- Products with special finishing.
- Materials that may move or change dimensions during production.
Always check the required bleed specification with your printing provider before preparing the final production file.
4. What Is a Trim Line?
The Trim Line represents the final edge of the product after cutting.
For example, if a business card has a finished size of:
90 × 55 mm
then 90 × 55 mm is the trim size.
The bleed area extends outside the trim line, while important text and graphic elements should stay safely inside it.
5. What Are Crop Marks?
Crop Marks, also known as trim marks or cutting marks, indicate where the finished product should be cut.
They are usually positioned around the corners of the artwork, outside the final trim area.
Crop marks help production operators:
- Identify the final product size.
- Locate the trimming position.
- Determine the corners of the finished artwork.
- Guide the cutting process.
However, it is important to understand that crop marks do not guarantee a perfectly exact cut with zero tolerance.
They are visual references for trimming, while the physical cutting process still has mechanical tolerances.
6. Avoid Creating Crop Marks Manually
If artwork is being exported as a production PDF, crop marks should generally be generated using the export settings in professional design software when required by the printer.
Applications such as Adobe Illustrator, Adobe InDesign, CorelDRAW, Affinity Designer, and other professional design programs provide built-in options for adding crop marks during export.
Avoid manually drawing crop marks too close to the artwork because incorrectly positioned marks may accidentally enter the visible production area.
Some printing companies may not require crop marks at all because they will impose or arrange the artwork using RIP software or production software.
Always follow the file-preparation specifications provided by your printer.
7. What Is a Safe Area?
The Safe Area is an area inside the trim line where important design elements should be placed.
Elements that should remain inside the safe area include:
- Text.
- Logos.
- Phone numbers.
- Addresses.
- QR Codes.
- Barcodes.
- Prices.
- Any important information that must not be trimmed.
For many small and medium-sized printed products, keeping important elements approximately 3–5 mm inside the trim line is a useful starting point.
For certain products, using an even larger safe area may provide better results.
8. Bleed and Safe Area Are Different
Bleed is located outside the trim line, while the safe area is located inside the trim line.
A simple way to understand the structure is:
Bleed Area → Trim Line → Safe Area → Important Content
Backgrounds and images that are intended to reach the finished edge should extend into the bleed area.
Text, logos, QR Codes, and other important information should remain inside the safe area.
9. Why Should Backgrounds Extend Beyond the Trim Line?
If a design contains a full-color background or a photograph that should reach the edge of the product, never stop the background exactly at the trim line.
The background should continue into the bleed area.
For example, if a blue background stops exactly on the trim line and the cutter shifts by approximately 1 mm, a white strip may appear along one edge.
If the same blue background extends 3 mm or more into the bleed area, the slight cutting shift will still occur over the printed blue area.
The finished product will therefore continue to look edge-to-edge.
10. Avoid Thin Borders Near the Edge of a Design
One of the most problematic design elements in printing is a thin border or frame that follows the outer edge of the finished product.
For example, imagine a business card with a 1 mm border positioned very close to the trim line.
On the computer screen, the border may look perfectly centered with equal spacing on all four sides.
After printing and cutting, however, the border may no longer appear symmetrical.
11. Why Can Borders Look Uneven After Cutting?
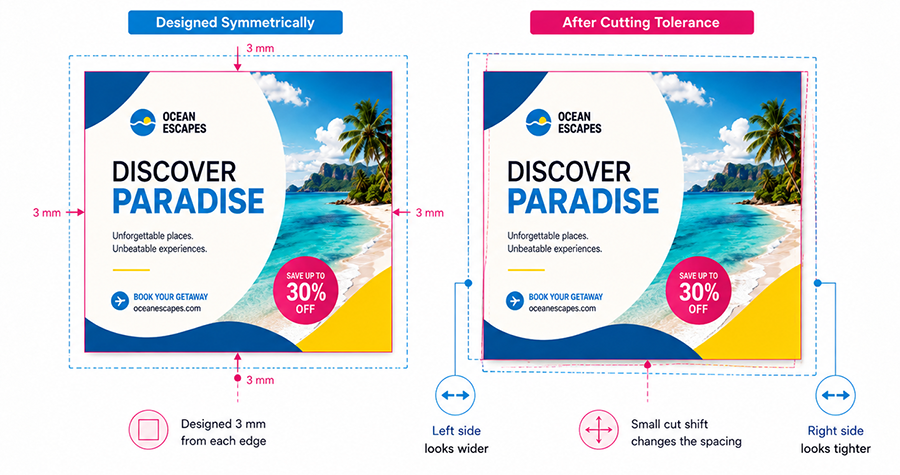
Imagine that a border is designed to sit exactly 3 mm away from every edge.
If the cutting position shifts 1 mm to the right, the final result may become:
- Approximately 4 mm of space on the left side.
- Approximately 2 mm of space on the right side.
The shift itself may only be 1 mm, but the human eye is very sensitive to elements that are supposed to be perfectly symmetrical.
As a result, the border can look noticeably off-center.
The thinner the border and the closer it is to the trim edge, the more obvious the misalignment will appear.
12. Cutting Machines Are Not Always 100% Identical on Every Cut
Modern cutting equipment can be very accurate, but real-world production still includes tolerances.
Small variations may come from:
- Material positioning.
- Registration sensors.
- Roller movement.
- Media condition.
- Length of the printed material.
- Machine calibration.
- Production speed.
- The cutting method being used.
For this reason, artwork should be designed to allow for normal production tolerances rather than assuming the machine will always cut at one exact digital coordinate.
13. Misalignment Can Start During Printing, Not Only Cutting
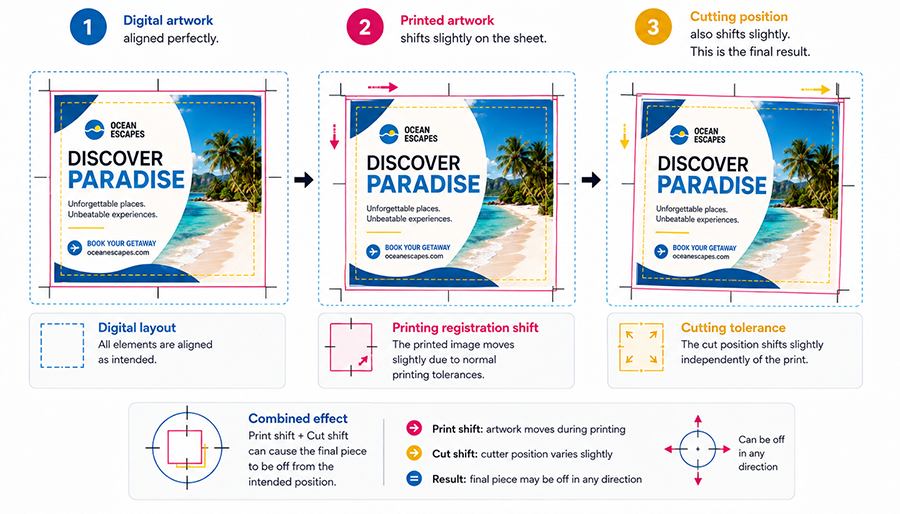
Another important point is that positional tolerance can already occur during the printing process.
Printed artwork may not always appear in exactly the same position relative to the edge of every sheet or piece of material.
When that printed material is then cut, the final product may be affected by a combination of:
Printing registration tolerance + cutting tolerance.
This is one of the main reasons why thin borders near the edge of a product are difficult to keep visually perfect.
14. The Problem Is More Noticeable in Double-Sided Printing
With double-sided printing, alignment becomes even more complicated because both the front and back artwork have their own positioning tolerances.
The front and back sides of a printed sheet may not overlap at exactly the same coordinates.
Small shifts can occur because:
- The media is flipped for the second side.
- The position changes when the material re-enters the printer.
- Roller movement is not identical on both passes.
- Duplex printing systems have registration tolerances.
- The material may change dimensions slightly.
- The front and back artwork may each shift slightly during printing.
15. Example of a Double-Sided Printing Alignment Problem
Imagine a card printed on both sides.
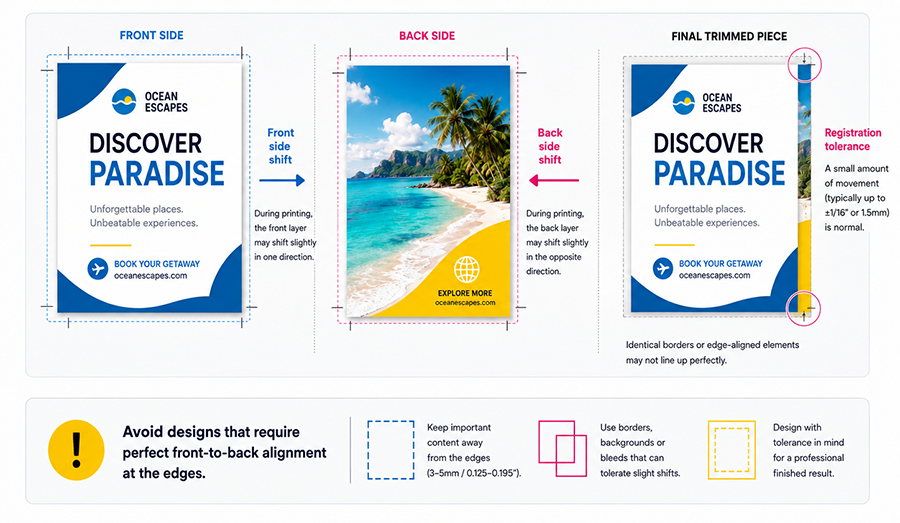
The front side contains a black border positioned 3 mm from the edge, while the back side uses an identical border.
Digitally, both sides are perfectly aligned.
However, during production the following may happen:
The front artwork shifts 0.5 mm to the right.
Then:
The back artwork shifts 0.5 mm to the left.
Once the card is trimmed, the borders on the two sides may appear to be in different positions.
This is why double-sided artwork that depends on perfect edge-to-edge front-and-back alignment is very difficult to guarantee with absolute precision.
16. Avoid Designs That Require Perfect Front-to-Back Alignment
For double-sided printing, avoid creating artwork where important elements on the front and back must sit at exactly the same coordinates.
Examples include:
- Identical thin borders on both sides.
- Frames positioned extremely close to the edge.
- Horizontal lines that must align perfectly between the front and back.
- Circles that must have exactly the same center point on both sides.
- Transparent or see-through effects that depend on precise front-to-back registration.
If precise alignment is essential to the design, discuss the required production tolerance with the printing company before finalizing the artwork.
17. What If You Still Want to Use a Border?
Borders can still be used, but they should be designed with cutting tolerance in mind.
Safer approaches include:
- Move the border farther away from the trim line.
- Use a thicker border.
- Use a decorative frame that does not depend on perfect symmetry.
- Leave more space between the border and the edge.
- Avoid very thin 1–2 mm frames positioned extremely close to the trim line.
The farther the border is positioned from the cutting edge, the less visually obvious a small cutting shift will be.
18. Do Not Place Text Too Close to the Trim Line
Text positioned too close to the cutting line is also risky.
Even when the text is not actually trimmed off, insufficient spacing can make the finished design look unbalanced.
For example, if text is positioned only 1 mm away from the trim line and the cut shifts by approximately 1 mm, the text may appear to touch the edge or could begin to be cut off.
Always use an appropriate safe area.
19. QR Codes and Barcodes Need Safe Space
QR Codes and barcodes should never be positioned too close to the cutting area.
Apart from the risk of being trimmed, QR Codes require clear space around them so that cameras and scanners can read them properly.
Make sure that a QR Code:
- Does not enter the bleed area.
- Is not positioned too close to the trim line.
- Has sufficient clear space around it.
- Is not covered by other graphic elements.
20. Basic Structure of a Print-Ready File
A simple print-ready file can be understood as three main zones:
Area 1: Bleed
The outermost area. Background colors, photos, and graphics that should reach the edge of the finished product must extend into this area.
Area 2: Trim
The trim line defines the final finished size after cutting.
Area 3: Safe Area
The inside area where text, logos, QR Codes, and other important elements should be positioned.
21. Example of a Simple File Setup
Suppose you are preparing an A4 flyer with a finished size of:
210 × 297 mm
A simple setup could be:
- Trim Size: 210 × 297 mm
- Bleed: 3 mm on every side
- Safe Area: at least 5 mm inside the trim line
The background should therefore extend 3 mm beyond the trim line, while important text and logos should remain approximately 5 mm or more inside the finished edge.
These measurements are only general examples. Always follow your printer's specifications because production tolerances can vary.
22. Crop Marks Should Not Enter the Bleed Area
Crop marks should remain outside the product area and should not touch artwork that will remain visible after trimming.
If crop marks extend too far into the bleed area, part of the crop mark may become visible on the finished product if the trimming position shifts.
Use crop mark settings provided by your design software or follow the template supplied by your printing company.
23. Consider Finishing Processes After Printing
Many printed products go through additional finishing processes such as:
- Lamination.
- Die cutting.
- Creasing.
- Folding.
- Rounded corners.
- Kiss cutting.
- Contour cutting.
- Hole punching.
Each finishing process also has its own production tolerance.
Important content should therefore remain safely away from areas where cutting, folding, creasing, or other finishing processes will occur.
24. Bleed Does Not Mean Enlarging the Entire Design
Another common mistake is creating bleed by scaling up the entire artwork.
Doing this can move text, logos, and other important elements closer to the edge.
Bleed should be created by extending the background or any elements that are intended to reach the edge.
Important text and graphics should remain safely positioned inside the trim size.
25. Do Not Add White Space as Bleed
Bleed is not simply an empty area outside the artwork.
If your design uses a red background, the bleed area should also be red.
If your design uses a full-page photograph, the photograph should extend into the bleed.
Adding a white margin outside the artwork will not prevent white edges from appearing after trimming.
26. Pre-Print Checklist
Before sending your final artwork to a printing company, check the following:
- Make sure the finished size is correct.
- Add bleed according to the printer's specifications.
- Extend backgrounds into the bleed area.
- Make sure backgrounds do not stop exactly at the trim line.
- Keep text and logos inside the safe area.
- Keep QR Codes and barcodes away from the cutting edge.
- Avoid thin borders positioned too close to the edge.
- Check both front and back artwork for double-sided printing.
- Do not depend on perfect front-to-back alignment.
- Use crop marks only when required.
- Make sure crop marks remain outside the visible artwork.
- Check areas used for folding, creasing, or other finishing.
- Export the PDF using appropriate print settings.
- Follow the template or production specifications provided by your printer.
27. Common Print Design Mistakes
Some of the most common file-preparation mistakes include:
- No bleed at all.
- Backgrounds stopping exactly at the finished size.
- Logos positioned too close to the edge.
- Text placed directly on the trim line.
- Thin borders running around the entire product.
- Crop marks created manually and positioned too close to the artwork.
- Double-sided designs created under the assumption that the front and back will always align perfectly.
- Scaling the entire artwork to create bleed.
- Ignoring the safe area.
28. Can Printing and Cutting Machines Be 100% Precise?
In print production, it is important to understand the difference between digital design precision and physical production tolerance.
Inside design software, an object can be positioned very precisely, even to fractions of a millimeter.
In real production, however, the process involves physical materials, rollers, sensors, ink, heat, blades, pressure, and many other mechanical factors.
Small positional variations therefore need to be anticipated during the design stage.
The purpose of bleed and safe areas is not to compensate for a faulty machine. They are used to make sure the final artwork still looks correct when normal production tolerances occur.
29. Good Print Design Takes Production Into Account
Artwork for printing should not be designed only to look perfect on a computer screen.
A good print design also considers how the finished product will be:
- Printed.
- Cut.
- Folded.
- Laminated.
- Mounted.
- Sewn.
- Shaped.
- Finished into the final product.
Understanding the production process from the beginning can prevent many problems before the artwork reaches the printing machine.
Conclusion
Bleed, crop marks, trim lines, and safe areas are essential parts of preparing professional artwork for printing.
Bleed provides extra printed area beyond the trim line so that backgrounds can still reach the edge of the finished product when small cutting shifts occur.
The safe area keeps text, logos, QR Codes, and other important information away from the trimming zone.
Crop marks help indicate the finished cutting position, but they do not guarantee that every cut will occur with absolutely zero tolerance.
Designers should also avoid thin line borders positioned very close to the edge of the artwork. Even a small shift during printing or cutting can make the border appear uneven or off-center, even when the finished product is still within normal production tolerance.
This becomes even more important with double-sided printing, because the front and back sides each have their own registration tolerances. For this reason, avoid designs that require the front and back artwork to align perfectly all the way to the outer edges.
By using sufficient bleed, maintaining an appropriate safe area, understanding normal cutting tolerances, and avoiding designs that depend too heavily on edge precision, you can achieve more professional printing results and significantly reduce the risk of production problems.